For flying online we rely on our FSD server software which is running for decades now and never let us down. So you need to connect you Flight Simulator to the FSD server we have running. To connect different flight simulator software to one FSD server you need client software and sometimes proxy software too. Depending on what flight sim software you have.
Popular client software for flight simulators are, Squawkbox and Xpilot but there are more. Below we will describe, per flight sim software platform, in short how to install and setup the client software to connect to our FSD server. So we can see each other in the virtual skies.
Flight simulators:
- Microsoft FS9/FSX
- Microsoft FS2020
- X-plane 11
- P3D
The software download you need per platform you can find below at the end of this page.
Microsoft FS9/FSX
Since these are relatively old flight sims and we have used these for years now, we will direct you to the description we used on our old website. So please follow this link.
Link to description how to install and setup FSINN.
Microsoft FS2020
<description here>
X-plane 11
Installation Phase
- Locate Xplane11 Multiplayer Tools.ZIP and download it. (below at end of this page)
- Right click on the “Xplane11 Multiplayer Tools.ZIP” file and choose Extract All Files
- You will see three ZIP files now within a new folder called “Xplane11 Multiplayer Tools“
- Right Click “XPUIPC 2.0.3.5 and XPWideClient 2.0.0.3.zip” and choose Extract All
- Navigate into the newly extracted files (typically a folder called “Xplane11 Multiplayer Tools” and you should see folders XPUIPC and XPWideClient.
- Copy the XPUIPC folder and the XPWideClient folder to your Xplane installation folders into the resources -> Plugins folder.
- Since I have bought Xplane using STEAM and have installed STEAM onto my second hard disk (drive D) the path I had to use was as follows:
- D:\Program Files (x86)\Steam\steamapps\common\X-Plane 11\Resources\plugins
- Open the XPUIPC folder and open the file XPUIPC configuration settings files in notepad. Where is shows “Server Address = 192.168.1.122″change the IP to address here to 127.0.0.1
- Save and close notepad
- For the XPWideClient folder you need to go into this and open the XPWideClient in notepad. You will see a setting for “IP Address of THIS PC = 192.168.1.122”. You need to change this to your PC IP address or even 127.0.0.1
- Save and close notepad again
- Next go back to your “Xplane11 Multiplayer Tools” folder and right click the CATC_Proxy zip file and extract all files.
- You will see one file called CATC_Proxy which you need to run. Go through the installer and install this on your hard drive anywhere
- Go back again to “Xplane11 Multiplayer Tools” and right click the XSB-1.3.3 zip file and extract all files.
- Go into your newly created folder and you will see one folder called XSquawkbox. Copy it to the Plugins folder for Xplane mentioned above e.g. for me it was: D:\Program Files (x86)\Steam\steamapps\common\X-Plane 11\Resources\plugins
- The installation phase is now complete.
Setting Up Phase
- You should find that when you installed the Catc_Proxy that you got a new icon on your desktop called MSFlights FSD Proxy. Double click this to run the software.
- Go up to file – settings and make sure your settings match these…
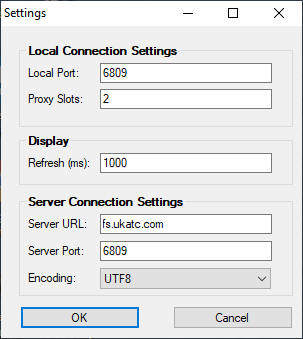
- Click on OK and then start FSD Proxy
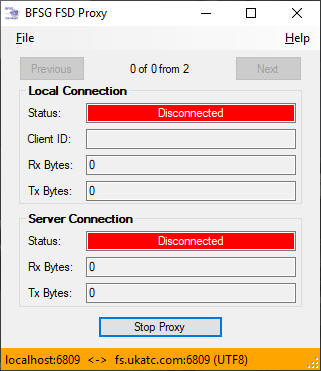
- your screen should like it does above which is fine. What it is actually showing you is that nothing is connecting into the proxy and nothing it connecting out from the proxy which is right at this stage
- Now start Xplane 11 and start a new Flight. When your game loads move the mouse to the top menu bar on the screen
- You will see a menu item called Plugins and within there a menu item called XSquawkBox. Move the mouse here and a number of additional
- options appear. Click on Connect
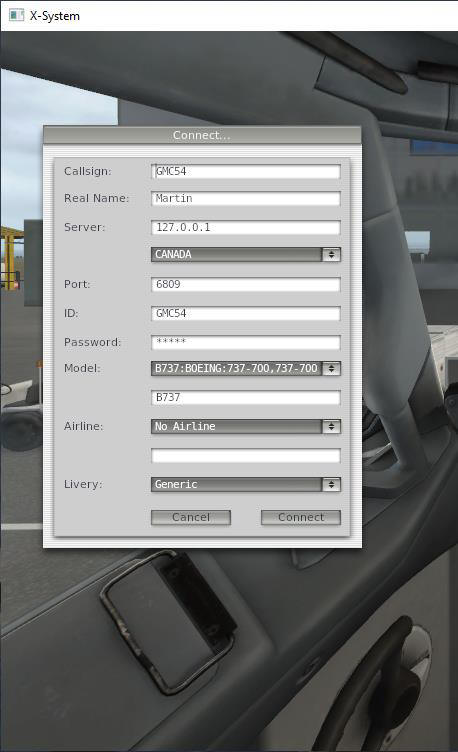
- You can set your flight plan options here and then click Send. Within 2 minutes the flight plan will appear on the server
- Please note that setting up this flight plan will not configure any plane systems so you must still manually enter the plan into the FMC
- The last thing to check if you are having any problems is to do the whole process with your windows firewall turned off. If you have a broadband / internet router connecting you to the internet this should offer a NAT firewall to protect your internal machines so you should be safe to do so. If you are uncomfortable doing this then simply add a windows firewall rule to allow outbound and inbound TCP and UDP port 6809
- You are ready to fly!!!!
P3D
<description here>
Software downloads:
| FS9/FSX | FSINN client |
| MS FS2020 | TBA |
| X-plane 11 | Xplane11 Multiplayer Tools.ZIP |
| P3D | TBA |